Quick start Tutorial: Set Up and Manage Translations
Welcome to getting started with Translations for Scroll Documents. In this tutorial, you’ll learn how to set up languages, translate content manually in Confluence, and lastly how to reuse previous translations.
Before You Start
Before you start this tutorial, we recommend reading the prerequisites and terms listed below.
Prerequisites
Make sure you meet the following prerequisites before starting the tutorial:
Scroll Documents and Translations for Scroll Documents are installed.
You have a test space you can use for this tutorial.
There is already a document created in the space.
The document has at least one Working version and two saved versions.
You have the space permissions:
View All
Add Pages
Add Attachments
Important terms
Make yourself familiar with the following terms:
Step 1: Add Languages to Your Document
Before you can start translating any content, you need to define an authoring language and the secondary languages you want to translate the content into.
Start with navigating to the Document Manager:
Click Scroll Documents from the Apps section in your space sidebar.
From the Document Library, click the document card of a document.
Or
From a page in a document, click Document toolbox.
Click on the cog icon.
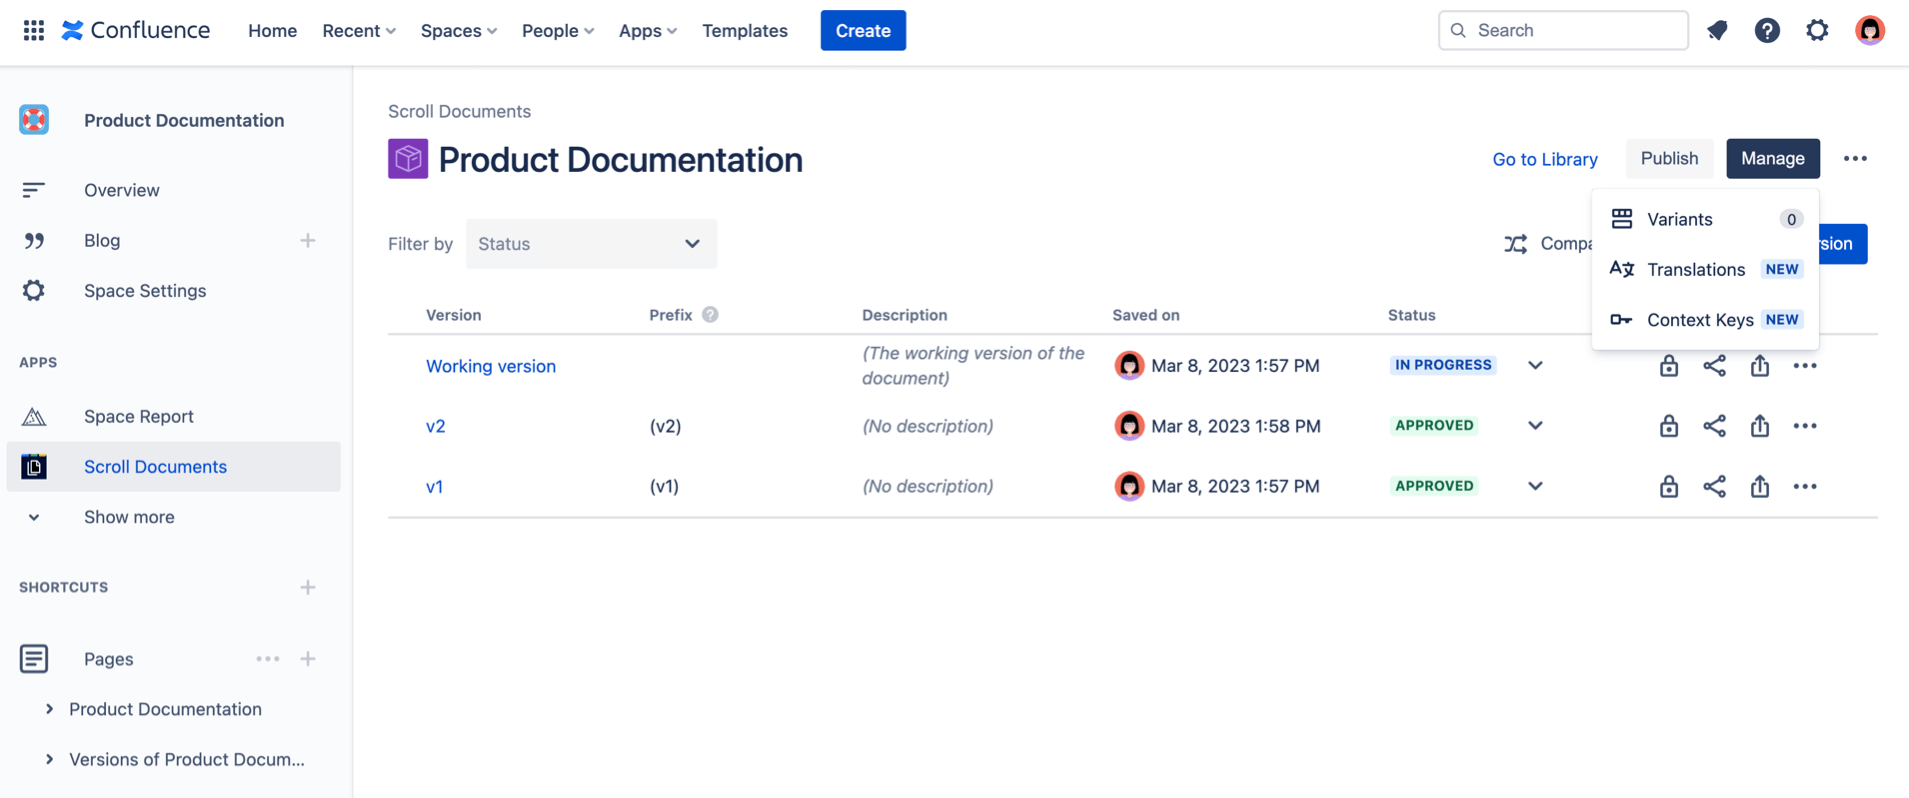
When you are in the Document Manager, follow the steps below to create languages:
1. Click Manage > select Translations.
2. Click Activate, this will open the “Activate Translations” dialog:
a. In the “Authoring language” dropdown select the language you want to base your future translations on, in this tutorial we will select English.
b. Click Activate.
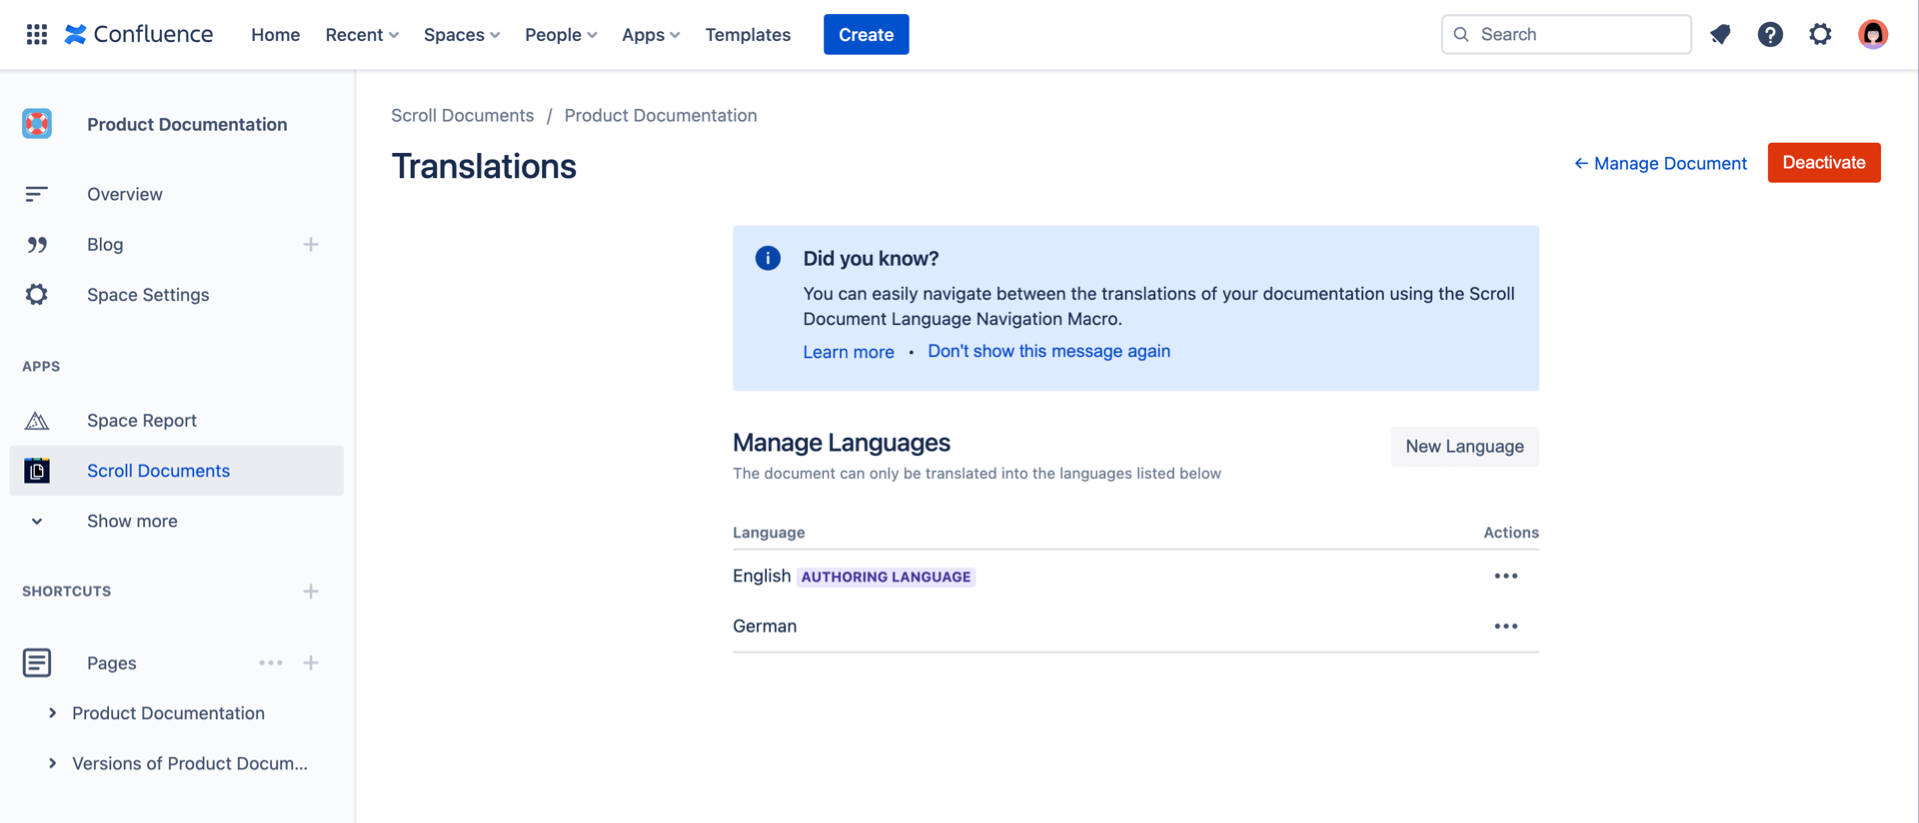
3. Continue with adding a second language, click New Language:
a. In the “Language” dropdown select a language which you want to translate your content into, in this tutorial we will select German.
b. Click Add, you should now see two languages added under “Manage Languages.”
Awesome!
An authoring language and a secondary language have now been added to your Scroll Document. Let’s continue with adding a translation to a version.
Step 2: Add a Translation to Your Version
When translating content in Scroll Documents, we recommend you only translate saved versions of your documents. Hence, before you proceed, make sure you have at least two saved versions in your document. If you have not done this yet, see: Save a Version.
The only notable exception when we don’t recommend translating only saved versions, is if you’re not interested in creating saved versions in the future. In that case, feel free to add a translation to the Working version, but please be aware that transferring those translations to saved version will not be possible.
Now, to add a translation to a version, follow these steps:
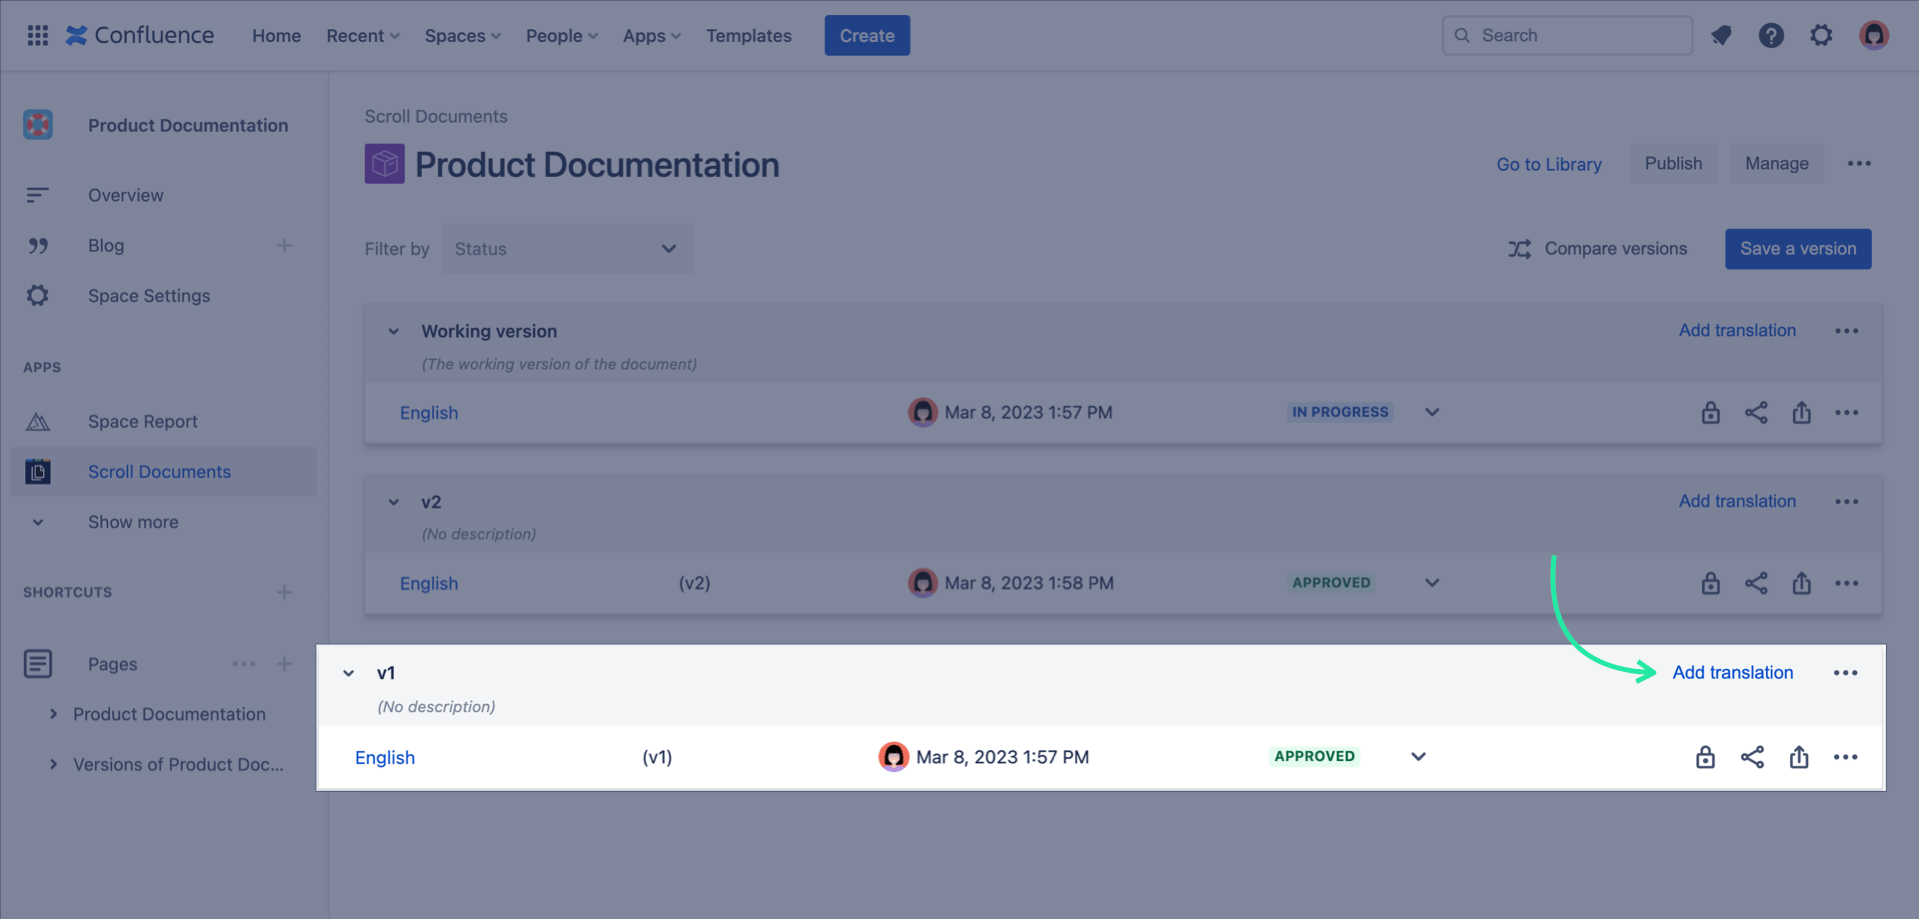
1. Click < – Manage Document, this will bring your back to the Document Manager from the Manage Languages overview.
2. Locate the first version you saved and click Add translation:
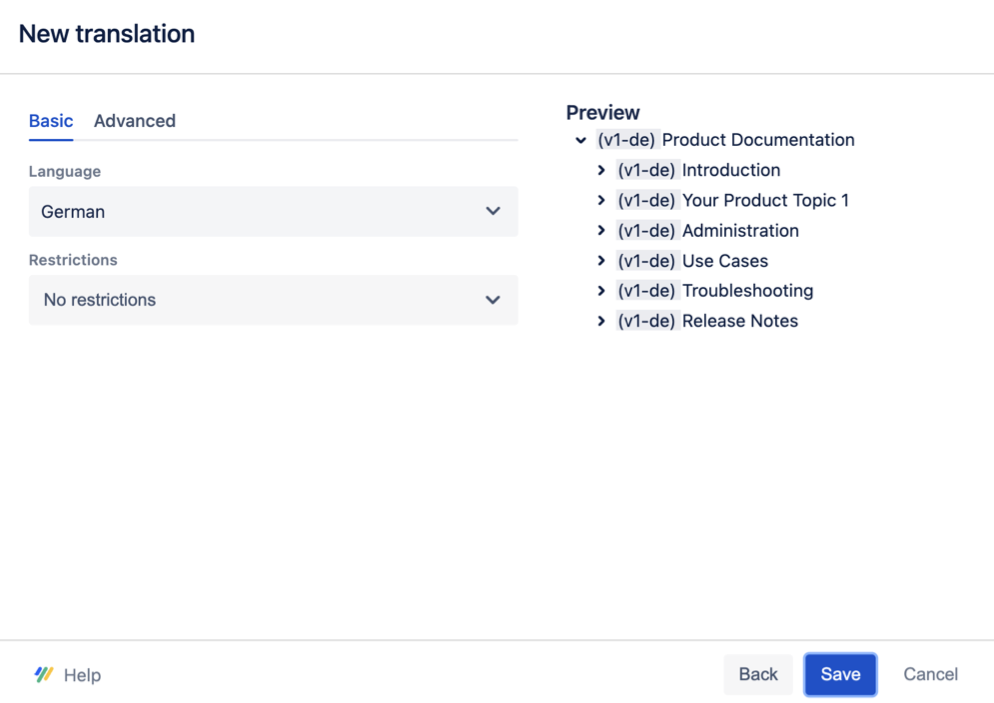
a. Select Manual Translation > Next.
b. Under the “Basic” tab select German > Save, a German translation (page tree) will now be added to the saved version enabling you to start translating the content into German.
Nice!
You have now added a translation to your saved version, this means you can start translating.
Step 3: Translate Your Page Content
You can now start translating the page content in a saved version. To start translating, follow the steps below:
1. Locate the German translation you added to your first version and click German, you’ll now be redirected to the Confluence page view where you can translate your content.
2. Click on any page in the German page tree, on the page you should see a macro saying “Translation needed” and the label “needs-translating.”
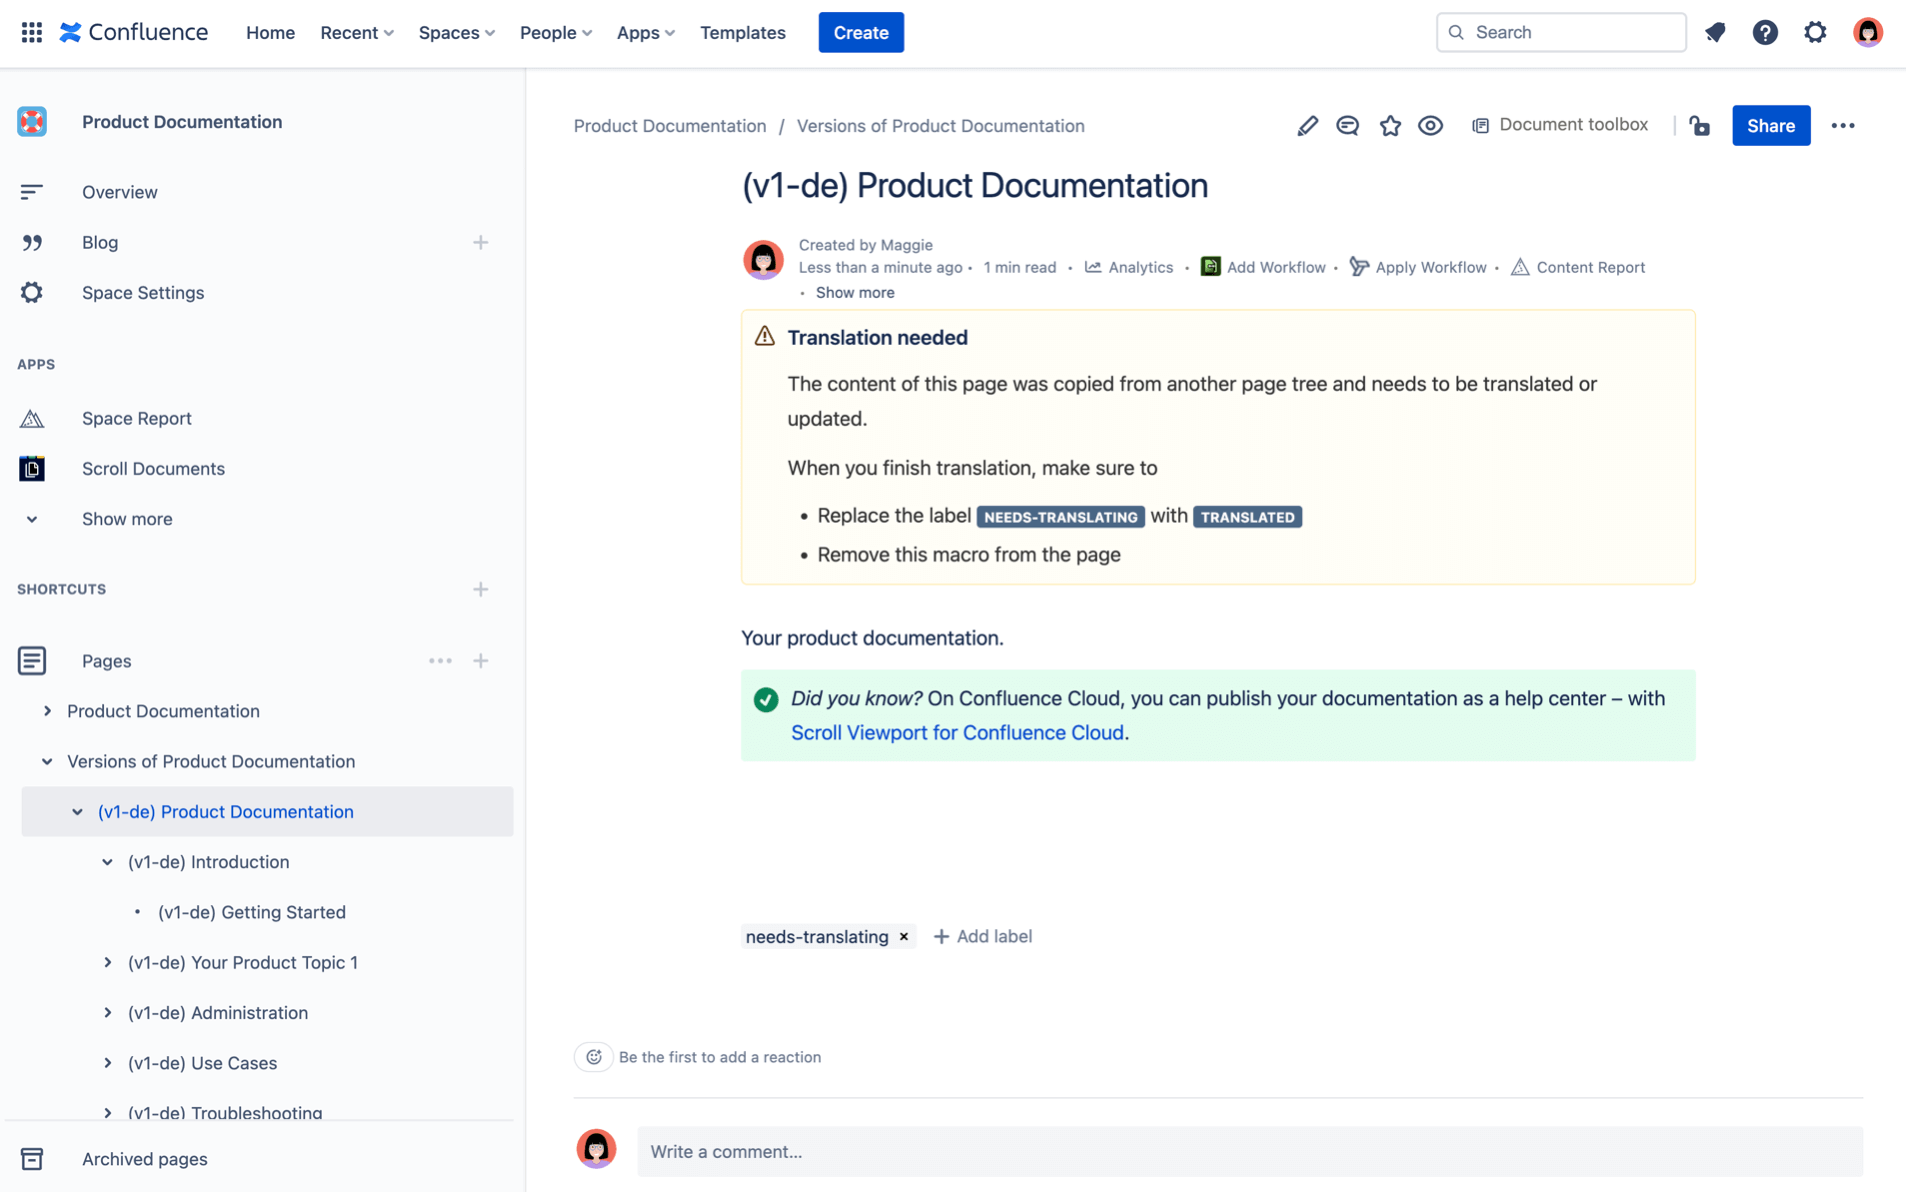
3. Click Edit to open the page in the editor.
4. Start replacing the English content with German content, when you are done:
a. Remove the “Translation needed” panel.
b. Click Publish.
c. Replace the label “needs-translating” with “translated.”
5. Repeat step 2-4c with every page you want to translate.
Great!
You have now translated your first version. In the next and last section, you’ll learn how you can reuse translations when translating your second version.
Step 4: Translate Your Second Version with Reused Translations
Let’s say you have made some changes to your Working version. You have added and updated only a few pages, which means you don’t need nor want to translate all the content again in your upcoming version. Below you’ll learn how to translate the page content in a second version, while reusing already translated content:
1. Navigate back to the Document Manager from the Confluence page view, on any page click Document toolbox > click Manage.
2. Locate the second version of your document and click Add translation:
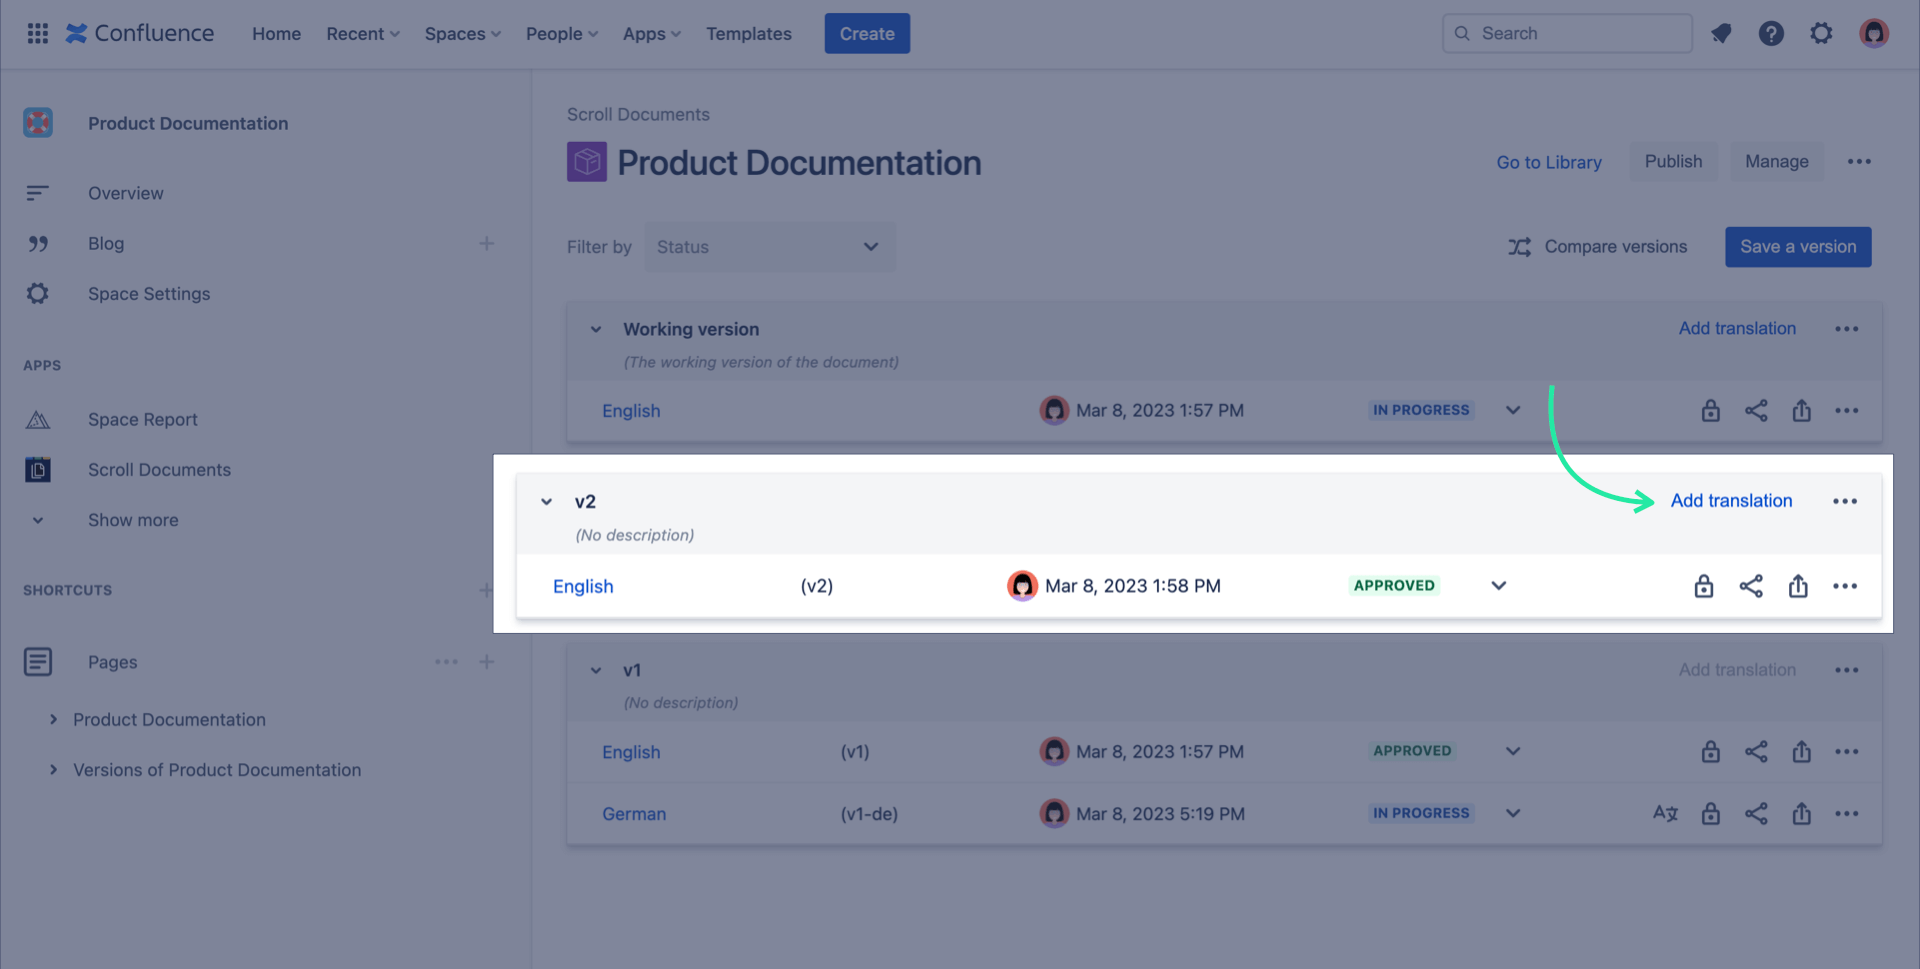
a. Select Manual Translation > Next.
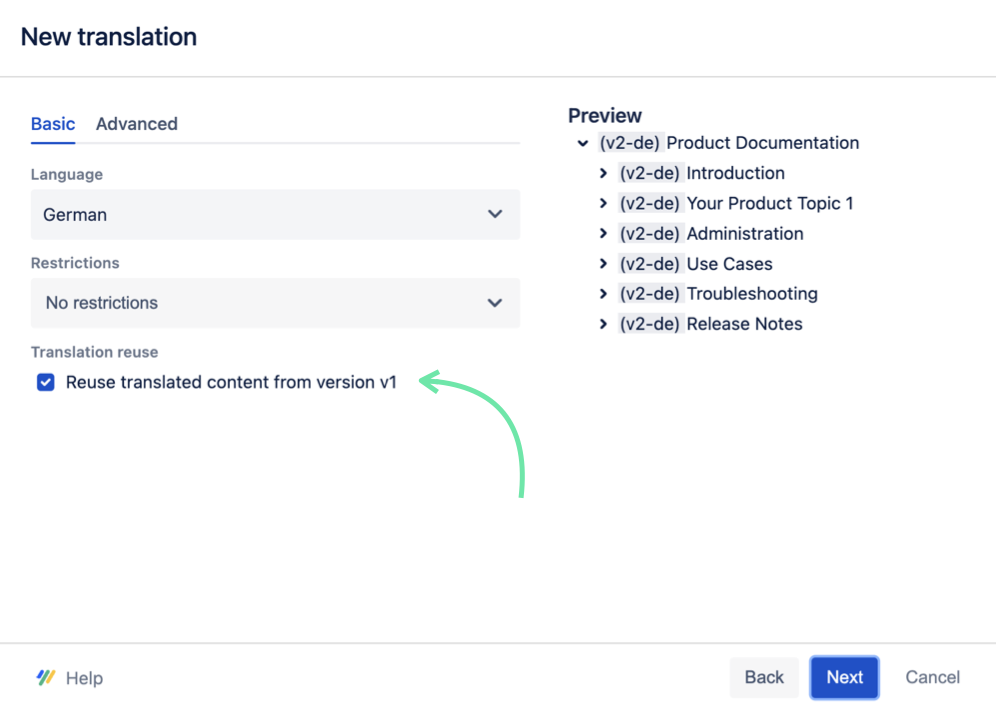
b. Under the “Basic” tab select German > check the box “Reuse translated content from version v1” > Next.
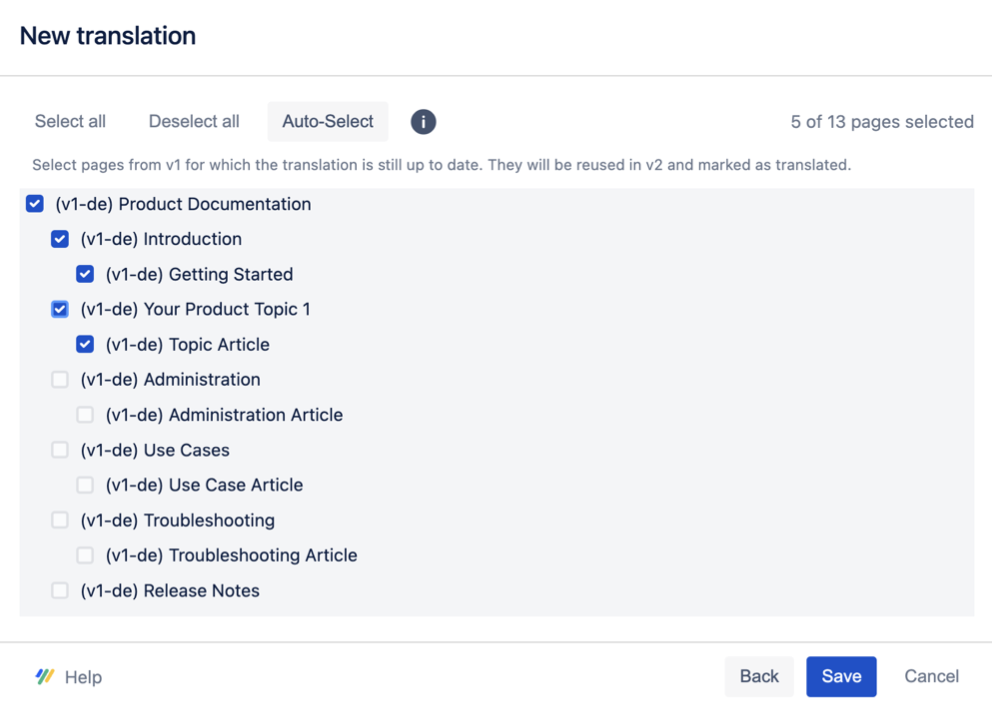
c. Click Auto-Select to check which pages have not been edited between v1 and v2 and select their corresponding translation pages > click Save, a german language will now be added to your second version and the translations from the pages you marked as up-to-date are reused in this version.
3. Click German in your second version, this will take you to the Confluence page view again.
4. Locate a page within your second version which you marked as up-to-date during the translation reuse. You should see that the translated content is still there and that the page has the label “translated.”
5. Continue with navigating to the pages which does not have any reused translations, you can now go ahead and translate those.
Well done!
You have now learned how to translate a version using reused translations. This quick start tutorial is completed.
Learnings 🏆
Let’s look back at what you’ve learned, in this tutorial you have learned how to:
add languages to your document,
add translations to your saved versions,
translate page content within Confluence,
and reuse already translated content.
Next Steps
As a next step, we recommend reading any of the following articles:
If you want quick help with setting up languages and translations, see:
If you want more guidance on how to update existing translations, continue with:
If you want to translate content using XLIFF exports, read:
If you are interested in ways of publishing translations, see: