Publish to a Scroll Viewport Site
To use this feature of Scroll Documents you will need to install Scroll Viewport first. Trial the app for free for 30 days.
Our integration with Scroll Viewport allows you to publish your Confluence documentation as an online help center - with full control over which versions, languages and variants to show.
In Scroll Viewport, your content can come from multiple content sources (represented as tiles in the above screenshot). Content sources can be Confluence spaces or Scroll Documents.
The advantage of adding a Scroll Document as a content source is that it allows you to decide which versions, languages and variants of your content should display on your Viewport site.
When more than one version, language or variant is selected, your help center visitors will be able to navigate your content with the help of a variant, language or version picker.
Creating a Site
Skip this step if you have already created a Scroll Viewport help center site.
To create your first site:
From the top navigation in Confluence select Apps → Scroll Viewport
Use the New Site form to create a new site
If you plan to publish translated content, make sure to Set Site Language(s) in Viewport’s Site Settings.
Now you are ready to add content from Scroll Documents to the help center.
Adding a Scroll Document to Viewport
To be able to select a Scroll Document in Viewport, make sure you create a document first.
Already have a site with a Confluence space as a content source and want to replace it with a Scroll Document? Learn how you can convert a space to a Scroll Documents.
To add content sources to your site, first go to one of your existing sites.
From the single site overview click on ‘+ Add content source’ button on the top right of your Content sources table. A new window will pop up where you can add one new content source at a time:
Select the content source type: Scroll Document.
In the content source field, enter the name of your document or space. If you can’t find your space or document, have a look at our troubleshooting articles Unable to Add a Document as a Content Source or Unable to Add a Space as a Content Source
Select the document from the drop down list and click Next.
Configure the URL segment for your document content source. By default, Viewport will use the document name for the content source segment of the URL.
Click Next.
Select which versions you want to add to your site. Check at least one version from the list. Which versions should I add to my site?
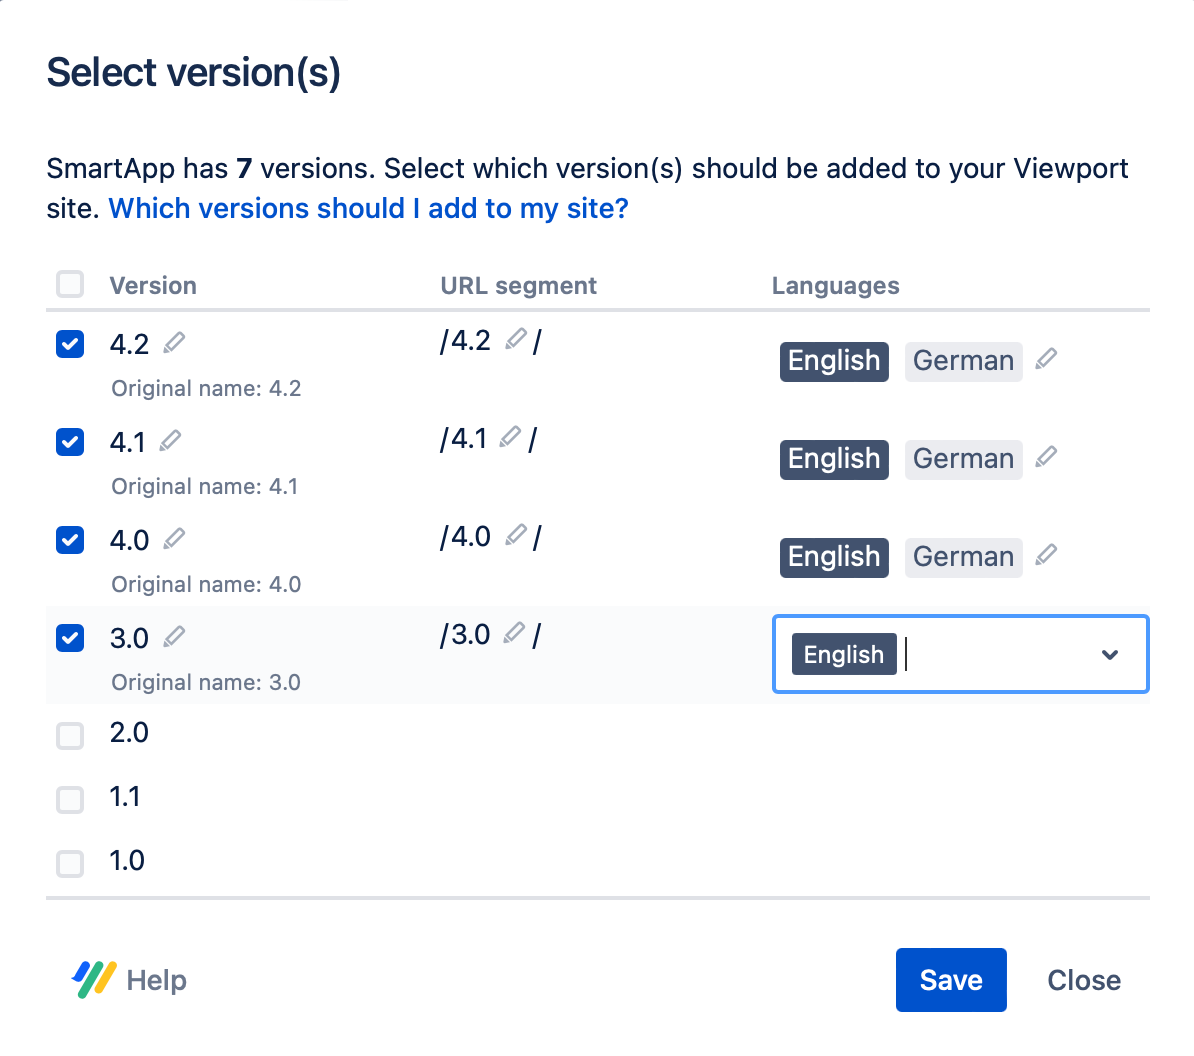
Optionally, edit the display name or URL segment for the version. Learn more.
If your document has languages: All your site’s languages will automatically be included for each version if a translation for that version exists. Optionally, you can remove translations that you don’t want to display in the site. Please note that the site’s default language needs to part of all selected versions. Learn more.
Click Next.
If your document has variants: Check at least one variant from the list. Optionally, edit the display name or URL segment for the variant. Learn more.
Click save and see your content source appear in the content source table.
Click update site to go live with your new content source.
If you select two or more versions, variants or languages, a version and/or variant and/or language picker will be added to your site. Use this picker to navigate between all the versions, languages or variants you selected for your site. Learn more.
You can always go back to the + button and add more documents to your live site. Don’t forget to update your site and go live so that the new documents appear in your live site.
Learn how to get the most out of Scroll Viewport.
Checklist for going live
The document title, cover image and document summary is used on the content source page and portal page of your Viewport site. Go to Edit document details in the Document Manager to change this information before you generate your site.
Make sure that the Scroll Documents you add have the right permissions set, so that Scroll Viewport can access its content and display it on your site.
The document version and variant name will appear as a segment in all of the URLs of that content source. Check if you’re happy with the default version and variant names and, if necessary, choose to specify the segments of the Viewport URL before going live.
If you change the version or variants segment later on and update your site, the URL to all article pages of that version or variant will change as well. Any links that use the old segment values would then break.